Categories
ASP.NET Core

Model Binding in ASP.NET Core

In the ASP.NET core, the razor page uses the HTTP request data. The model binding helps to get the data from various sources. It converts string data to .NET data type and provides it to controller and razor pages. Previously, the developer should extract the contents from the HTTP request and manually assign the value to the properties. But the model binding simplifies the work. It automatically binds the browser data to the controller action parameter.

How Model Binding Works

Consider the following controller action. The action method Contact has two parameters ID and name. The ID parameter is an integer and, the name parameter is a string.

[HttpGet]
public ActionResult Contact(int ID, string name)
{
——
return View();
}

Imagining the HTTP request is ~/Contact?id=5&name=harry. The above Contact action method will bind the value 5 to the ID parameter and, harry to name parameter. First, the model binding will find the first parameter of the contact method, in this scenario, an integer ID. Then it will check the request and find the value for the parameter. The ID parameter in the request is a string.

So the model binding will convert the string ID 5 to an integer. Then it will check for the next parameter name and find the value harry, as it is a string it will bind the value to the parameter. Here the binding is not case sensitive. So the action parameter can be mentioned as ID or id. The model binder will bind the null value to the parameter if there is no value for the parameter. For example, if the HTTP request is ~/Contact?id=5 then it will pass the null value to the name parameter. But imagine, the request is ~/Contact?name=harry then it will throw an error message. Because an integer parameter cannot be Null.

What is [BindProperty] attribute?

A BindProperty attribute can be applied to the public property of the controller or page model. When you apply this attribute, it will create a model binding to the property.

public class HomeController : Controller
{
[BindProperty]
public string Name { get; set; }
[BindProperty]
public string Age { get; set; }


}

The above one is an example of [BindProperty] attribute. The [BindProperty] applied to the public properties Name and Age. So it is a direction to the binding framework to bind the corresponding properties.

Also, you can use the [BindProperty] for complex type as shown below.

[BindProperty]
public Customer Customer { get; set; }

[BindProperty] properties

There are two properties available in [BindProperty] attribute, Name and SupportsGet. Usually, the model binding will connect the field names with the property. If the property does not match with any of the field names, then the property will not bind with any value. For example, the HTTP request is ~/Contact?usrID=5&name=harry, then the model binding will never bind the usrID value to ID property. In this case, the Name property helps to bind the value. The following is an example of how to bind the usrID value to ID property.

[BindProperty(Name =”usrID”)]
public string ID { get; set; }

By default, the model binding will work for the POST request. The SupportsGet property helps to bind the GET requests.

[BindProperty(SupportsGet = true)]

[BindProperties] attribute

The [BindProperties] attribute is available in ASP.NET core 2.1 and later. You can apply this attribute to the controller or page model class. So the model binding will bind all the public properties in the class.

[BindProperties]
public class ModelBindingModel : PageModel
{


}

From the above article, you can acquire knowledge about what is model binding in ASP.NET MVC, how it binds the request to a controller action, how it reduces the work of developers, what is [bindProperty] attributes and how to use the attribute with public properties. If you have any questions, please leave a comment.

Categories
Technology

Static Image in Blazor – Inside and Outside Web Root

This article explains how to display a static image in the Blazor component. In ASP.NET Core  static files are served by Microsoft.AspNetCore.StaticFiles middleware. First, let’s look at the general way to display the image in the Blazor component.

Inside the Web Root

To display a static image in the Blazor component, first, it must store the image in any folder under the wwwroot file. It can be accessed by the relative path. To serve a static image, you need to use the app.UseStaticFiles () method in the start.Configure file.

The following is the Blazor component code. Here the image is obtained from {applicationFolder} /wwwroot/Image/InsideWebRoot.png.

@page “/”
<h3> Display Image in Blazor</h3>
<div>
    <img  src=”/Image/InsideWebRoot.png”   />
</div>
@code {
}

Outside the Web Root

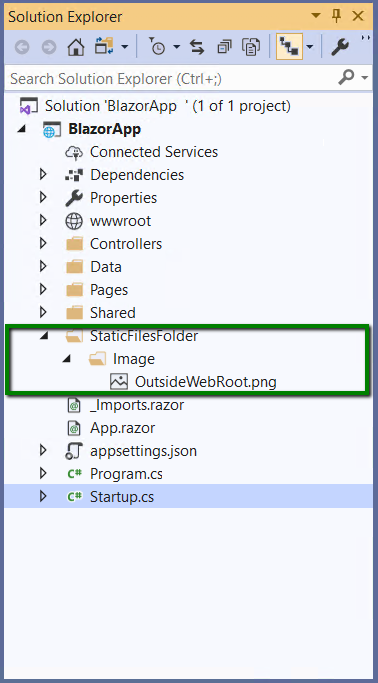
The static file can also be served outside the web root. Consider the following image, here the StaticFilesFolder/Image is created outside the wwwroot folder.

Static Image

To serve this, you first need to configure the UseStaticFiles () method in the Startup.cs file. In the following code, UseStaticFiles uses FileProvider to locate the static file. PhysicalFileProvider is used to access the physical path. The request path is set to “/staticFiles”, which is mapped to the static file.

public void  Configure(IApplicationBuilder  app, IWebHostEnvironment env)
{
    app.UseStaticFiles();
 
    app.UseStaticFiles( new StaticFileOptions
    {
FileProvider = new  PhysicalFileProvider(
       Path. Combine(Directory . GetCurrentDirectory(), “StaticFilesFolder” )),
RequestPath = “/StaticFiles”
    });
}

The following is the Blazor component code. The static image path in the img tag is assigned as “/StaticFiles/Image/OutsideWebRoot.png”. The /StaticFiles is a RequestPath that is configured in the startup.cs file. So the following code will show the static image that is outside the web root.

@page “/”
<h3> Display Image in Blazor</h3>
<div>
    <img  src=”/StaticFiles/Image/OutsideWebRoot.png”  />
</div>
@code {
}

This article explains how to display a static image in Blazor Component.

If you have questions, please leave a comment.

Categories
ASP.NET Core

Tag Helpers in ASP.NET Core

Tag Helpers introduced in ASP.Net Core helps to develop a cleaner and better readable HTML markup. The Tag Helper is much easier to read and maintain for those who can understand HTML. With Tag Helper, the designer can edit the razor code without the knowledge of C# razor syntax. The web designers can get an HTML-friendly development experience.

Tag Helpers are classes that manipulate HTML elements. It implements the ITagHelper interface. Therefore, it helps to create a view content using C# logic. There are many built-in Tag Helpers available in .NET for common applications. The developers can also build their own customized Tag Helpers.

Tag Helper Basic

Here new { @class =  “form – control”}  is an HTML Helper attribute. When typing bootstrap class name ‘form-control’ visual studio will not provide Intellisense support.

@Html.TextBoxFor(m => m.StudentName, new  { @class = “form – control”}

But in the Tag Helper, the IntelliSense will support in all the markup and developer can use all the attributes of HTML element like class, style, etc. The following example is the same code in Tag Helper. When typing ‘class=’ the IntelliSense will display all the class names.

<input asp-for=”StudentName class =”form-control” />

When you use the Tag Helper you can avoid @signs, lambdas, and other helpers

Input Tag Helper Example

Input Tag Helper helps to bind the model values to the razor view. The following is a syntax for Input Tag Helper.

<input asp-for =“<Expression Name>” />

The above syntax will generate the name and id HTML attributes using the asp-for attribute. The asp-for attribute is a model expression. Here, asp-for=’property’ is equal to m=>m.property in the HTML helper.

@
var studentName = “ Peter“; 
 <input asp-for =“@studentName  />

The above code will generate the following HTML:

<input type= “text” id= studentName  name=studentName  value= Peter />

Tag Helper scope

The @addTagHelper, @removeTagHelper and the ‘!’ controls the Tag Helper scope.

@addTagHelper

@addTagHelper *, Microsoft.AspNetCore.Mvc.TagHelpers

The @addTagHelper directive makes the Tag Helper available in the view. The default ASP.NET core projectView/Shared/_ViewImports.cshtml includes the @addTagHelper.

@removeTagHelper

@removeTagHelper    Microsoft.AspNetCore.Mvc.TagHelpers

The @removeTagHelper directive helps to remove the Tag Helper availability from the view.

Opting out of individual elements

It is possible to disable the Tag Helper for a particular HTML element using the opt-out character (!)

<!span  asp-validation-for=”Email” class =”text-danger”></!span>

By adding the opt-out character (!) in opening tag and closing tag, the Tag Helper will get disabled in the element.

The Appearance of Tag Helper

The developer can clearly identify the Tag Helpers code in the visual studio with a unique color code. For example, when typing label HTML element in the visual studio it will display the word label in brown color.

appearance of tag helper

When typing asp-for (Tag Helper attribute) immediately the code will change to bold purple color

Tag Helper attribute

Note

The visual studio theme is blue or light, and then it will change the Tag Helper font to purple. If it is a dark theme, then the font will change to bold teal.

This article briefs about the Tag Helper in ASP.NET core. ASP.NET core already has lots of built-in Tag Helper. However, developers can create their own custom Tag Helpers.

If you have questions, please leave your comments.

Categories
Mobile App Development

Firebase Phone number authentication IONIC (Android):

This article explains how to do a phone number authentication in Android mobile app.

Step 1:

First sign into the below Firebase link using Google credentials.

https://console.firebase.google.com/

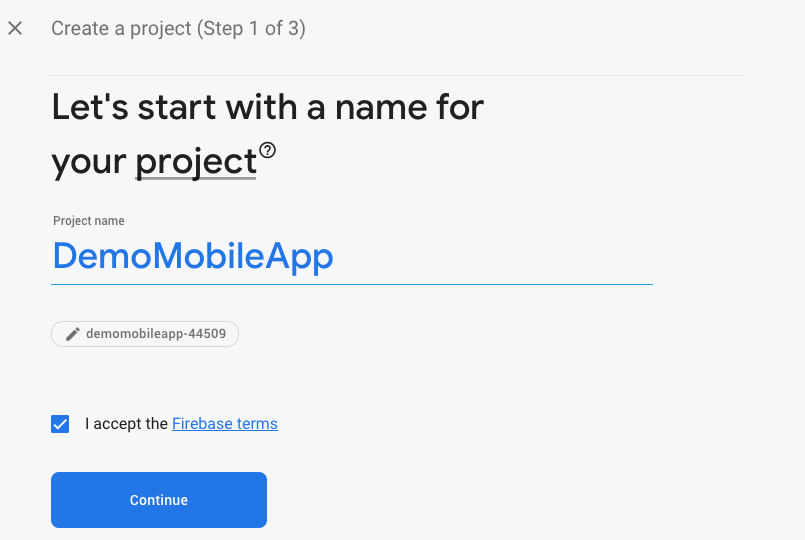
We can create new projects using ‘Create a Project’.

Phone number authentication - step 1

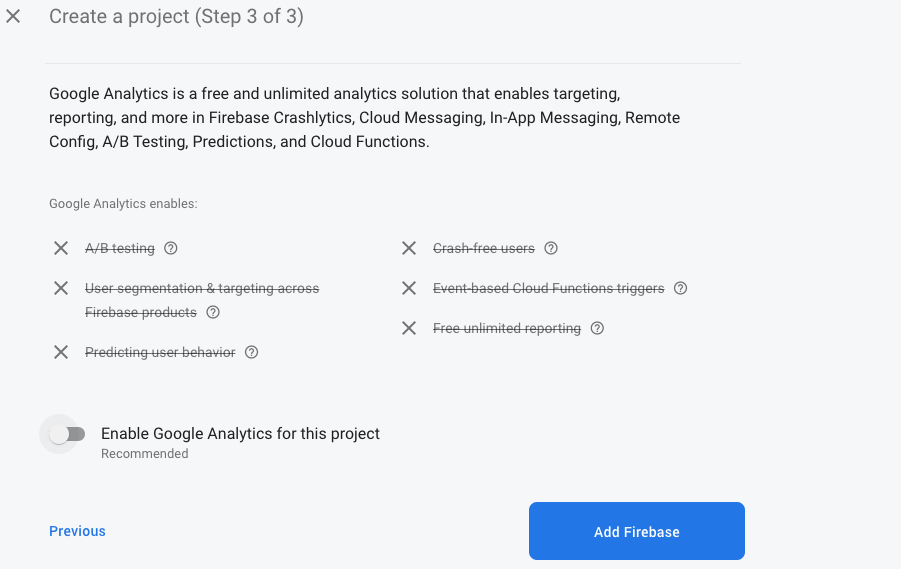
Disable the Google analytics toggle bar as we are not using Google Analytics and proceed to Add Firebase

Phone number authentication - step 1A

Step 2:

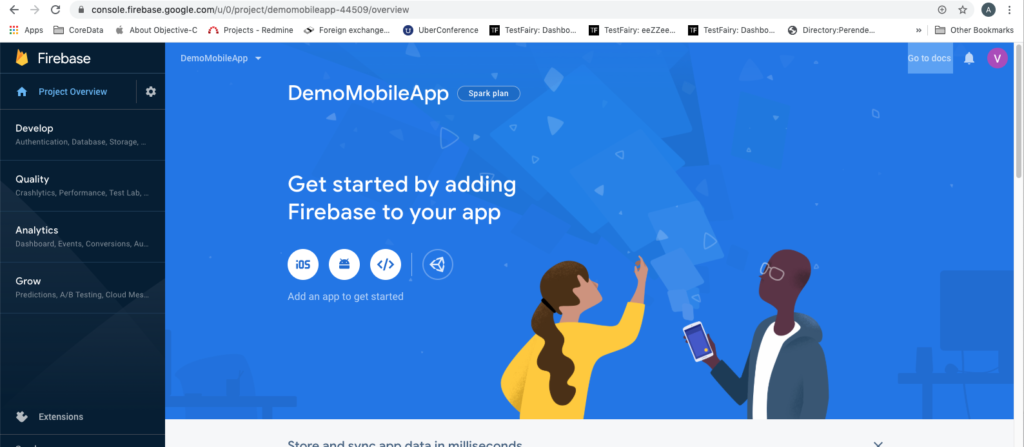
The created project gets displayed in the console. After selecting the project screen, the below screen is displayed.

Phone number authentication - step 2

Here we are going to add an Android App by selecting the android icon.

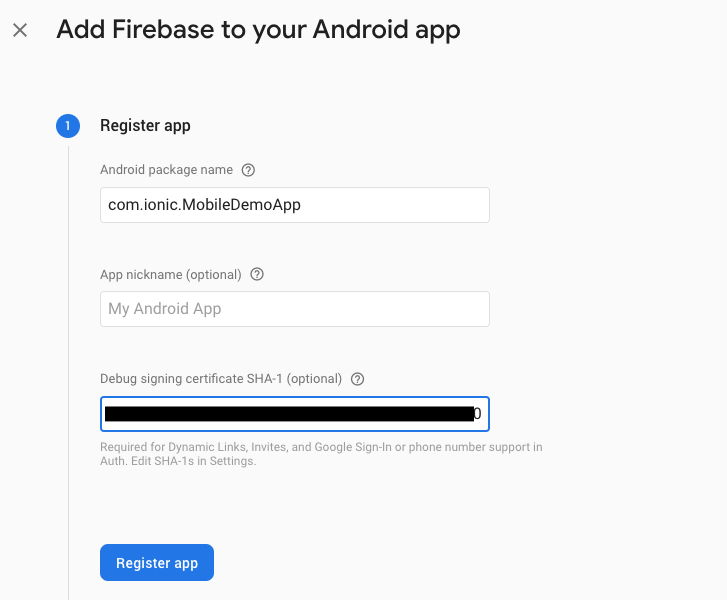
We should add an Android package name, because this is a mandatory one. SHA1 also can add for phone number authentication.

Phone number authentication - step 2A

How to get SHA1?

In the Mac system use the below command in terminal to get SHA1 key

keytool -list -v -keystore ~/.android/debug.keystore -alias androiddebugkey -storepass android -keypass android

Phone number authentication - step 2B

Step 3:

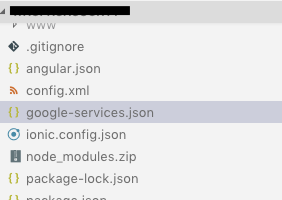
Download google-service.json file and add to the project folder.

Phone number authentication - Step 3

Step 4:

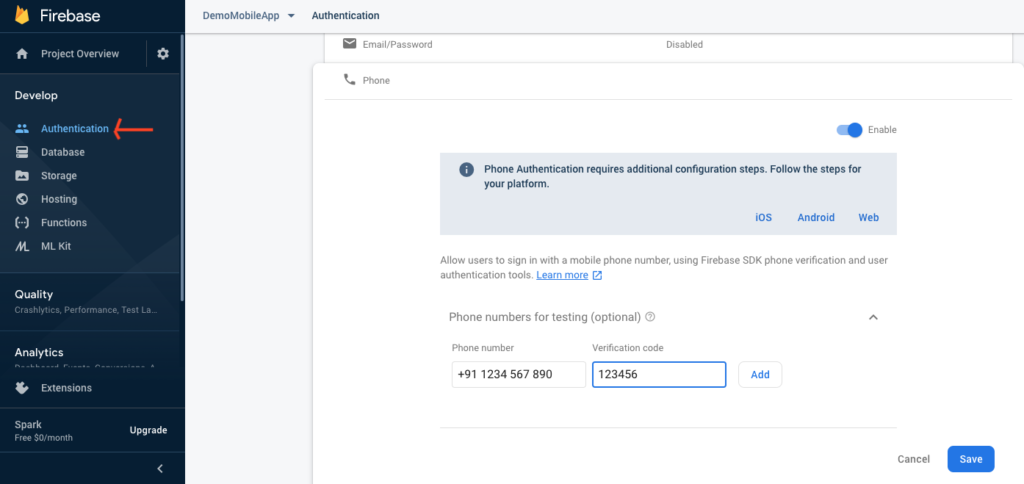
Next we can go to the Authentication section under project in Firebase console. Firebase has multiple authentication methods, we can enable the phone option and save it.

Firebase provides an option for Phone numbers for testing. We can enter a random number and provide a static password for it. In this scenario Firebase won’t send OTP every time, but will send the Verification code after that we can use the static OTP, which we already provided in Firebase.

Phone number authentication - step4

Step 5:

Here we needed to create a web app for Firebase config, and to this config add as a parameter in firebase initializeApp method.

<script>

// Your web app’s Firebase configuration

var firebaseConfig = {

apiKey: “AIzaS**********************”,

authDomain: “***-********.firebaseapp.com”,

databaseURL: “https://***********.firebaseio.com”,

projectId: “****************”,

storageBucket: “****************.com”,

messagingSenderId: “****************”,

appId: “1:****************:9****************f09”

};

// Initialize Firebase

firebase.initializeApp(firebaseConfig);

</script>

Categories
Software Testing

Automated Testing

Automated testing is a software testing method where an automated tool is used to test the software application and compare the actual and expected outcome. In the case of large projects, testing all the functionalities manually becomes tedious and in some scenarios, testing has to be repeated numerous times during development to ensure quality, this is where automation comes in. Automation replaces a series of manual testing tasks and involves automating the creation of test cases and execution of those test cases. Automated testing can also be used to test the application for load and performance. As it is impossible to automate all testing activities, it is important to identify the set of tasks that needs to be automated.

Advantages of automated testing

  • Testing can be repeated any number of times with no additional cost.
  • Brings efficiency in testing.
  • Reduces testing time.
  • Early detection of defects saves cost.
  • Automated testing is reliable. It brings actual results all the time.
  • Very useful to test repetitive tasks.
  • Complicated applications can be tested at ease.
  • Test results are precise and error-free.
  • Test scripts can be reused.
  • Increases the coverage of testing.
  • Automation testing is comprehensive and covers more functionality.
  • Automated testing can run without manual intervention.
  • Possible to simulate hundreds of virtual users during a performance test.

Deciding between manual and automation testing depends on the application to be tested. For instance, Testing an application for usability is best done manually. For GUI based applications, manual testing will be the best option whereas for a data-driven application automated testing will work best. There are some applications that require both manual and automation testing.

Automation in testing can be achieved through testing tools. Testing tools can be open source or commercial solutions.  Testing tools comes with numerous functionalities and capabilities and finalizing the tool is an important phase of the testing cycle. There are many popular testing tools that include Selenium, Katalon Studio, UFT, Test Complete, SoapUI, Apache JMeter and Postman. As automated testing is tool dependent, you need to choose the right tool that meets your project needs. The testing team should possess good knowledge about the testing tool and its features.

Things to keep in mind while selecting a tool

  • Does the selected tool best meet your project requirements?
  • Is the tool within your budget?
  • Does the tool support different types of test?
  • Does it have reporting capability?
  • Does it work on various platforms like web, mobile and desktop?

Testing that can be automated include:

Load – Automation proves beneficial in case of load testing. The testing tool can simulate thousands of virtual users and analyze the performance of the application

Smoke Testing – After each build, a quick automated test is done to review the code and find defects at an earlier stage.

Regression Testing – An automated tool is used to test the functional and non-functional aspects of the software after the software is updated.

Unit Testing – Automated testing is done at the source code level where the smallest piece of code is tested.

Integration Testing – Combine the unit tested modules and check if the interfaces and interactions between modules are functioning properly.

Functional Testing – Automated Testing to check the user interface and how the application functions.

Automated testing will reduce the development time and has many benefits when implemented properly. Seek expert advice and make an informed decision about the right testing method for your project.

Categories
Development

Tips for writing clean code in C#

This post will help you speed up your C# code and provide many tricks that every professional developer must know.

1. Validating input “first”

Look at the code snippet below

Validating input “first”

In this method we have many lines of code and we need to read all the code to find the last line that throws an exception if the argument is null. Instead, we can validate the input first. This tells the viewer of the code how a given method should be used.

The below code is rewritten with the reverse order of if and else statements.

reverse order of if and else statements

You can now quickly tell what is the valid argument for this method

2. “Else” is not always required

Let’s continue with the same previous example. If an employee is null we throw an exception and code does not continue to execute. So there is no need for an else block. Having an else block here only increases the indentation of the code. Here is a better way to write this code.

“Else” is not always required

3. Auto-property Initializers

One of the features added from C# 6 onward is a way to initialize properties directly like fields. We usually create constructors to initial properties like below.

Auto-property Initializers

Instead of the constructor used above we can directly initialize the property as shown below.

directly initialize the property

4. Null-conditional Operator

Many times we would have encountered the following type of coding for checking an object for null before accessing one of its members.

Null-conditional Operator

From C# 6 onwards we have a null-conditional operator (?) that evaluates null. If the object is null then the value null will be returned.

 value null

In the above example there are two null-conditional operators, one checks null in the employee object and another checks null in the address object present inside the employee. If any one is null then addressID will be set to null.

5. Null-coallescing operator

Continuing from above example, in case we do not want null value to be returned and want addressId to be an integer with default value ‘0’ when employee or address is null. We can use the null-coallescing operator (??) as shown below.

Null-coallescing operator

6. Expression Bodied Members

We can often encounter methods having single line return statement like below

Expression Bodied Members

Instead of above we can rewrite using expression bodied members, thus it reduces line indentation.

expression bodied members
Categories
Solutions

Enterprise Mobility Solutions

Businesses today are leveraging cutting-edge mobile technology to streamline their business operations and stay connected. Enterprise mobility solutions are required to grow business substantially in this digital era. ‘Enterprise Mobility’ refers to automating your business processes through mobile devices and encouraging employees to complete the task anywhere and anytime.

The Enterprise mobility market is expected to see tremendous growth in 2020. The enterprise mobility solution connects employees, suppliers and customers through a single platform and enhances business opportunities. To reap maximum benefits, the enterprise mobility solution should be aligned with your business goals. UX is critical to the success of enterprise mobile application. When developing an application utmost importance is given to user experience. More and more organizations have started investing in feature-rich enterprise mobile apps to redefine their business.

How Enterprise Mobility can benefit your business?

Mobilizing your business can bring in the following advantages:

  • Increase employee productivity
  • Optimize business operations
  • Expand the business outreach
  • Accessible anywhere anytime.
  • Improved communication
  • Improved customer service
  • Real-time access to data
  • Increased ROI

Prior to implementing Enterprise Mobility Solutions, analysis is done to evaluate the need for mobility solutions.

  • Present mobile capabilities of the organization
  • Effect of mobility on the employees and clients
  • Feasibility study to check if the business functions can be mobilized
  • End-user analysis
  • Risks and threats associated with implementing a mobility solution
  • Business goals to be achieved

While Organizations are in need of enterprise mobility solutions, they face challenges in transforming their idea into reality. If your organization is willing to explore the mobile solution to run the day-to-day business, it would be ideal to bring experts to implement the transformation.

How to develop enterprise mobility solutions?

  • Identify the requirements of the organization
  • Outline an approach
  • Identify the technology platform
  • Decide between the native and cross-platform approach
  • Develop the application
  • Test on different devices
  • Deploy the solution and launch it on the app store

Our Expertise in Enterprise Mobility Solution

Techcedence has the expertise and skill set in consulting, design and development of enterprise mobility solutions. We adopt a strategic approach to deliver mobility services. Our team of mobile experts has built innovative mobile solutions across different verticals that include Travel, Healthcare, Real Estate, Retail, and Logistics. Our advanced mobile solutions are functionally rich, user-friendly and improve productivity.  

Get in touch with us to develop a mobile strategy for your business requirements.

Categories
Software Testing

A Beginners Guide to Test Automation Framework

A testing framework is a combination of practices and tools designed to provide a foundation for test automation. Test automation uses software to run the test cases and check the actual and predicted outcome. The Test automation framework is an execution environment for running automated test scripts.

A test automation framework is important for effective and efficient automated testing. It provides reusable components like utilities and libraries and helps the QA team to test effectively in a shorter time frame.

Advantages of a test automation framework

There are many advantages of using a test automation framework. It accelerates script development and execution. It primarily saves time and cost and makes it easy for the QA team to adopt standard practices.

  • Reusable code
  • Low maintenance
  • Less manual intervention
  • Increased test coverage
  • Reliable and consistent
  • Efficiency and accuracy
  • Easy analysis of results

Types of Test Automation Framework

There are different types of test automation framework available.

  • Linear automation Framework
  • Modular Testing Framework
  • Data-Driven Testing Framework Keyword Driven Testing Framework
  • Hybrid Testing Framework
  • Library Architecture Testing Framework
  • Linear automation Framework

This is a basic level test automation framework that operates in a linear fashion. The tester records each step and plays the script to execute the test in linear order. This framework is suitable for testing small-sized applications.

  • Modular Testing Framework

In this model, the testers divide the entire application into multiple modules and test scripts are created module wise. This framework is commonly referred to as a module-based framework. The individual test scripts are combined to build a larger test using a master script. The master script invokes the modules to run test scenarios.

  • Data Driven Testing Framework

The Data-driven framework allows creating test scripts for different sets of test data. All possible inputs and expected outcomes are kept in data files. This framework comes handy when functionality has to be tested for different set of inputs. The test framework provides input through external files such as Excel sheets, MS Access tables, SQL Database, XML files and observes test outcomes.

  • Keyword Driven Testing Framework

This framework is similar to a data-driven testing framework. In this model, keywords or action words for each function are defined in table format. Test scripts are created based on the keywords.

  • Hybrid Testing Framework

This framework is a combination of the above frameworks. It can be customized to the project needs and it leverages the benefits of all associated frameworks.

  • Library Architecture Testing Framework

This is similar to the modular testing framework. Instead of dividing the application based on test scripts it is split based on common functions. These functions are placed in a library that can be accessed by test scripts.

This article briefs about popular testing frameworks used for automation testing. The testing framework should be scalable and application independent. It is helpful when a team of developers is programming different modules of an application. A standard framework will help developers to adopt a common approach towards automation.

Categories
Development

Field Service Application and its Advantages

Field Service Management refers to managing resources involved in the installation and servicing of equipment. In Field Service Management, Managers are under constant pressure to meet customer expectations, monitor the work done by service technicians and provide insightful data to management. Scheduling and dispatching service executives based on their availability is also cumbersome. Technicians / Service executives are also in need of tools to ease their work in the field. Getting the right information at the right time can improve their productivity. The service team requires access to real-time data to address customer queries and provide better service. Challenges faced by technicians on the field include lack of access to information about the customer and previous work order, delay in getting approval from supervisors, sending instant updates about the job status. This article briefs how a field service software accelerates business productivity.

What is Field Service Management Software?

Any Organization that deploys technicians to the client site can make use of Field Service Software. The software can assist your sales team to spend more time selling and have better communication with the customer. The application is conveniently installed on the technician’s mobile device. The application is integrated with back-office and technicians get access to customer history.

A field service application automates and manages end-to-end field service operations. The software aligns the service operation in line with your business goals. The software enables to effectively manage your workforce and schedule tasks.  A good field service application allows Managers and Supervisors to spend less time monitoring the service operations on the field.

The goal of any business is to provide better customer service. A field service software helps to achieve higher customer satisfaction and customer retention. The software helps in effective work order scheduling by quickly assigning tickets based on the technician’s skill set, availability and current location. It reduces the delay in addressing customer tickets. It also allows the rescheduling of tickets if the customer / technician is not available and reduces downtime. The software allows managing the inventory of equipment and spare parts used while servicing.

Customer Portal

The FSM application comes with a customer portal that can be installed on both Android and iOS devices. The portal allows customers to register a service request, view invoices, AMC and warranty details and make an online payment.

The FSM application is also integrated with call center operations allowing quick scheduling of tickets.

Advantages to the technicians

  • Effective work planning for the day
  • Assign tickets for the day
  • Access to information from anywhere
  • Improved communication between customer and technician
  • Get Reminders and notifications
  • Automates billing
  • Captures Digital Signature

Benefits to the Organization

  • Optimized task scheduling
  • Higher Return on Investment
  • Fully automated invoicing and billing
  • Real-time Analytics
  • Instant updates on the job status
  • Speedy Issue Resolution
  • Improved Customer Service
  • Effective scheduling of tickets
  • Reduces downtime /unproductive time
  • Easy Inventory Management
  • Dashboards and analytics
  • Reports on service team performance
  • Reports on Service History
  • Insights for better decision making
  • Integration with ERP

There are many FSM software available in the market. But one size doesn’t fit all. Finding the right field service application can be challenging.

If you are looking for a field service management software that can be customized for your business, contact us today.

Categories
Development

Custom Software or Off the Shelf – Decide what is right for you

Deciding between custom software and off the shelf software is a key business decision for any organization. Each option has its own merits and drawbacks. You have to weigh them carefully before deciding what is beneficial for your business.

Off the shelf

An Off the shelf (or bespoke) software refers to products that are readily available in the market. It comes handy and requires less set up time. They are designed for a broader audience so they will have numerous features all of which might not be useful to your business. The off the shelf product may not have certain functionalities that your business demands. Some vendors provide options to customize the product based on your requirements.

Pros

  • Quick set up – can be implemented straight away
  • Free trials – you can try them for free
  • Discussion forum – you can get answers from user forums for queries
  • Low upfront cost – initial set up cost is low
  • Regular upgrades available

Cons

  • License cost – you have to buy the product
  • High maintenance cost – upgrades, changes, and support comes with additional cost
  • Ownership – you don’t own the source code
  • Lacks Scalability – it is not easy to modify the product
  • Missing features – it may not have all elements required by your business
  • Compatibility issue – it might conflict with your current system

Custom software

Be it a shoe or a dress we all know one size doesn’t fit all. An off the shelf software might be readily available but it might not help your business plan in the long run. Custom software is designed exactly to match your requirements and overcomes the shortcomings of an off the shelf product. It might come with a higher initial cost but it requires no license and upgradation is easy as you own the source code.  Most of the custom applications are user-friendly as they don’t have redundant functionalities. A well-built custom application can be better than any commercial off the shelf product.

Pros

  • Tailor-made – customized for your business
  • Ownership – you get ownership of the product
  • Expandable – flexible, can scale up with changing needs of your business
  • Maintenance and support – easy to get technical assistance from the development team
  • Secured – security aspects of the application can be designed to your choice
  • Integration – easier to integrate with other systems
  • An advantage over your competitors who use same off the shelf product

Cons

  • Cost – Higher initial cost as it is done exclusively for you but has a long term gain
  • Time – It definitely takes time to build custom software.

The risk involved in building a custom software might be addressed by choosing an organization who has ample expertise in developing custom applications. Weighing the pros and cons and keeping your long term business goal in mind decide on the right option.

Get in touch with us for any questions you may have regarding custom software development.